What is Steampunk?

Steampunk is a phenomena, which started as a literary trend in the 1980ies and later developed into an art genre, cultural movement, style and own subculture. It connects futuristic and technical functions with means and devices of the Victorian era (1837-1901) and envisions a view into the future based on that era. Thus Steampunk involves a setting where the victorian fashion and culture is idealized and steam power is still widely used. Machines often use cog mechanics and characters often have a certain "Do-it-yourself" mentality and a drive for adventures.

In the world of today you can find elements of Steampunk in many disciplines, such as movies, games and music. However, there are versatile other varieties of Steampunk that use certain elements, but exclude or change others.
Plans for my Steampunk Helmet

My general idea was to create a diving helmet with some mystical element which sticks out. I had several simple sketches like this one.
The basis for the final helmet is a Star Wars clone trooper helmet, which I purchased on ebay. It has nearly no scratches or marks, just some spots where it began to lose paint, what didn´t matter to me. At first I did a throrough cleaning of all its parts before sandpapering the surface of the helmet with a #400 sandpaper. The helmet has several coats of paint and clear varnish and it definetily pays off to create a rough surface. This way glues and paint will stick better on the helmet.
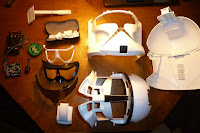
After sandpapering all parts , I decomposed the helmet completely and took out all electronic parts, the battery box, cables and the speaker. Additionally, I rempved several plastic pieces, such as buttons and the power switch, as it might distract from the smooth and closed surface the subaqua helmet should have.
As I planned to use spray paint, I wrapped the visor in plastic foil to keep it free from scratches and paints.


 Today I closed most vents and started to give the front of the helmet a smoother surface.
 With all the pieces available I started experimenting about the final design of the helmet. My goals at this point were to give the helmet a clear outlook that reminds of vintage deep-sea divers o nthe one hand and to mix it with some mystical, futuristic elements on the other hand.
 Beyond these basic goals, I wanted to add some mystical elements, to give the helmet and its owner a more distinct character.
 Steampunk is a phenomena, which started as a literary trend in the 1980ies and later developed into an art genre, cultural movement, style and own subculture. It connects futuristic and technical functions with means and devices of the Victorian era (1837-1901) and envisions a view into the future based on that era. Thus Steampunk involves a setting where the victorian fashion and culture is idealized and steam power is still widely used. Machines often use cog mechanics and characters often have a certain "Do-it-yourself" mentality and a drive for adventures.
 In the world of today you can find elements of Steampunk in many disciplines, such as movies, games and music. However, there are versatile other varieties of Steampunk that use certain elements, but exclude or change others.
 My general idea was to create a diving helmet with some mystical element which sticks out. I had several simple sketches like this one.
 After sandpapering all parts , I decomposed the helmet completely and took out all electronic parts, the battery box, cables and the speaker. Additionally, I rempved several plastic pieces, such as buttons and the power switch, as it might distract from the smooth and closed surface the subaqua helmet should have.
